POJO-actor Tutorial Part 2-3: Improving the Workflow API — Introducing the @Action Annotation

This article is a hands-on tutorial for the POJO-actor workflow API, focusing on the @Action annotation introduced in POJO-actor v2.14.
We explain how to define workflow-callable actions in Java actors without overriding callByActionName(), using a practical example with conditional branching.
In Part 2-2, we implemented workflow actions by overriding callByActionName() and dispatching actions with a switch-case statement. While this approach works, the method grows quickly as the number of actions increases and becomes difficult to maintain.
To solve this problem, POJO-actor v2.14 introduces the @Action annotation. With this annotation, workflow actions can be defined declaratively on actor methods, eliminating the need for explicit dispatch logic.
In this tutorial, we reimplement the Turing machine example (turing87), which outputs an irrational binary sequence (0.001011011101111...), using the @Action-based workflow API. This example includes conditional branching and represents a more practical workflow scenario.
Introduction
In Part 2-2, we explained how to extend IIActorRef and override the callByActionName() method.
@Override
public ActionResult callByActionName(String actionName, String args) {
    switch (actionName) {
        case "initMachine": ...
        case "put": ...
        case "move": ...
        default: return new ActionResult(false, "Unknown action: " + actionName);
    }
}
This works, but the callByActionName() method grows larger as you add more workflow-callable actions.
To solve this problem, POJO-actor v2.14 introduces the @Action annotation. You no longer need to explicitly write callByActionName() — just annotate your methods.
In this tutorial, we implement turing87 (a Turing machine that outputs the irrational number 0.001011011101111...) introduced in Part 2-1 using the @Action annotation. This is a more practical example that includes conditional branching.
Step 1: Create the POJO (Same as Part 2-2)
The POJO requires no changes. It's a plain Java class that knows nothing about the workflow.
Turing.java
public class Turing {
    int currentPos = 0;
    Tape tape = new Tape();

    /** Initialize the machine */
    public void initMachine() {
        this.currentPos = 0;
        this.tape = new Tape();
    }

    /** Write a value to the tape */
    public void put(String value) {
        this.tape.setWithResizing(this.currentPos, value);
    }

    /** Move the head ("L"=left, "R"=right) */
    public void move(String direction) {
        if (direction.equalsIgnoreCase("L")) {
            this.currentPos--;
        } else if (direction.equalsIgnoreCase("R")) {
            this.currentPos++;
        }
    }

    /** Print the tape contents */
    public void printTape() {
        System.out.println("TAPE\t" + this.tape.toString());
    }

    // Methods for conditional branching (used in turing87)

    /** Check if current position value matches expected */
    public boolean matchCurrentValue(String expected) {
        String current = this.tape.get(this.currentPos);
        return expected.equals(current);
    }

    /** Check if current position has any value */
    public boolean isAny() {
        String current = this.tape.get(this.currentPos);
        return current != null && !current.isEmpty();
    }

    /** Check if current position is empty */
    public boolean isNone() {
        String current = this.tape.get(this.currentPos);
        return current == null || current.isEmpty();
    }
}
Step 2: Create the IIActorRef — @Action Annotation Version
This is the main topic. Let's first review the code from Part 2-2.
Part 2-2 Code (switch statement version)
public class TuringIIAR extends IIActorRef<Turing> {

    public TuringIIAR(String actorName, Turing turing, IIActorSystem system) {
        super(actorName, turing, system);
    }

    private String parseFirstArg(String args) {
        if (args == null || args.isEmpty() || args.equals("[]")) {
            return "";
        }
        JSONArray array = new JSONArray(args);
        return array.length() > 0 ? array.getString(0) : "";
    }

    @Override
    public ActionResult callByActionName(String actionName, String args) {
        try {
            switch (actionName) {
                case "initMachine":
                    this.tell(t -> t.initMachine()).get();
                    return new ActionResult(true, "initialized");

                case "put":
                    String putValue = parseFirstArg(args);
                    this.tell(t -> t.put(putValue)).get();
                    return new ActionResult(true, "put " + putValue);

                case "move":
                    String direction = parseFirstArg(args);
                    this.tell(t -> t.move(direction)).get();
                    return new ActionResult(true, "moved " + direction);

                case "printTape":
                    this.tell(t -> t.printTape()).get();
                    return new ActionResult(true, "printed");

                case "matchCurrentValue":
                    String expected = parseFirstArg(args);
                    boolean match = this.ask(t -> t.matchCurrentValue(expected)).get();
                    return new ActionResult(match, "match=" + match);

                case "isAny":
                    boolean any = this.ask(t -> t.isAny()).get();
                    return new ActionResult(any, "isAny=" + any);

                case "isNone":
                    boolean none = this.ask(t -> t.isNone()).get();
                    return new ActionResult(none, "isNone=" + none);

                default:
                    return new ActionResult(false, "Unknown action: " + actionName);
            }
        } catch (Exception e) {
            return new ActionResult(false, "Error: " + e.getMessage());
        }
    }
}
To connect action names written in YAML workflow files to the Java program, we override callByActionName() and dispatch actions using a switch statement.
In turing87, we also need conditional branching actions (matchCurrentValue, isAny, isNone), making the switch statement quite long.
Part 2-3 Code (@Action version)
Rewriting the same functionality with the @Action annotation looks like this:
import static com.scivicslab.pojoactor.core.ActionArgs.*;
import com.scivicslab.pojoactor.core.Action;
import com.scivicslab.pojoactor.core.ActionResult;
import com.scivicslab.pojoactor.workflow.IIActorRef;
import com.scivicslab.pojoactor.workflow.IIActorSystem;

public class TuringIIAR extends IIActorRef<Turing> {

    public TuringIIAR(String actorName, Turing turing, IIActorSystem system) {
        super(actorName, turing, system);
    }

    @Action("initMachine")
    public ActionResult initMachine(String args) {
        this.object.initMachine();
        return new ActionResult(true, "Machine initialized");
    }

    @Action("put")
    public ActionResult put(String args) {
        String value = getFirst(args);
        this.object.put(value);
        return new ActionResult(true, "Put " + value);
    }

    @Action("move")
    public ActionResult move(String args) {
        String direction = getFirst(args);
        this.object.move(direction);
        return new ActionResult(true, "Moved " + direction);
    }

    @Action("printTape")
    public ActionResult printTape(String args) {
        this.object.printTape();
        return new ActionResult(true, "Tape printed");
    }

    // Conditional branching actions (used in turing87)

    @Action("matchCurrentValue")
    public ActionResult matchCurrentValue(String args) {
        String expected = getFirst(args);
        boolean match = this.object.matchCurrentValue(expected);
        return new ActionResult(match, "match=" + match);
    }

    @Action("isAny")
    public ActionResult isAny(String args) {
        boolean any = this.object.isAny();
        return new ActionResult(any, "isAny=" + any);
    }

    @Action("isNone")
    public ActionResult isNone(String args) {
        boolean none = this.object.isNone();
        return new ActionResult(none, "isNone=" + none);
    }

    // No need to override callByActionName()!
}
You no longer need to write the callByActionName() method. Each action becomes an independent method, linked to the YAML via @Action("actionName"). The base class uses reflection to discover @Action-annotated methods and dispatches automatically.
@Action Method Requirements
Methods annotated with @Action must follow this format:
@Action("actionName")
public ActionResult methodName(String args) {
    // processing
    return new ActionResult(success/failure, message);
}
- Return type:
ActionResult - Parameter: Single
String(YAMLargumentspassed as JSON string) - Visibility:
public
Argument Formats
YAML arguments can be written in three formats:
| YAML notation | Value passed to args | Parse example |
|---|---|---|
arguments: "value" | ["value"] | new JSONArray(args).getString(0) |
arguments: ["a", "b"] | ["a", "b"] | new JSONArray(args) |
arguments: {key: "value"} | {"key": "value"} | new JSONObject(args) |
The args parameter receives a JSON string. Use ActionArgs.parse() for unified access.
import com.scivicslab.pojoactor.core.ActionArgs;

@Action("example")
public ActionResult example(String args) {
    var p = ActionArgs.parse(args);  // Parse in one line

    // For array format (arguments: "value" or arguments: ["a", "b"])
    String first = p.get(0);
    String second = p.get(1);

    // For object format (arguments: {host: "server", port: 8080})
    String host = p.get("host");
    int port = p.getInt("port", 80);  // With default value
}
Step 3: Create the YAML Workflow
Define the workflow in YAML. POJO-actor v2.14 allows you to write actions concisely using array format.
Array Format vs Object Format
Traditional object format:
- actor: turing
  method: put
  arguments: "e"
Array format (introduced in v2.14):
- [turing, put, "e"]
Array elements are in order: [actorName, methodName, arguments]. If there are no arguments, just [actorName, methodName] is fine.
turing87.yaml
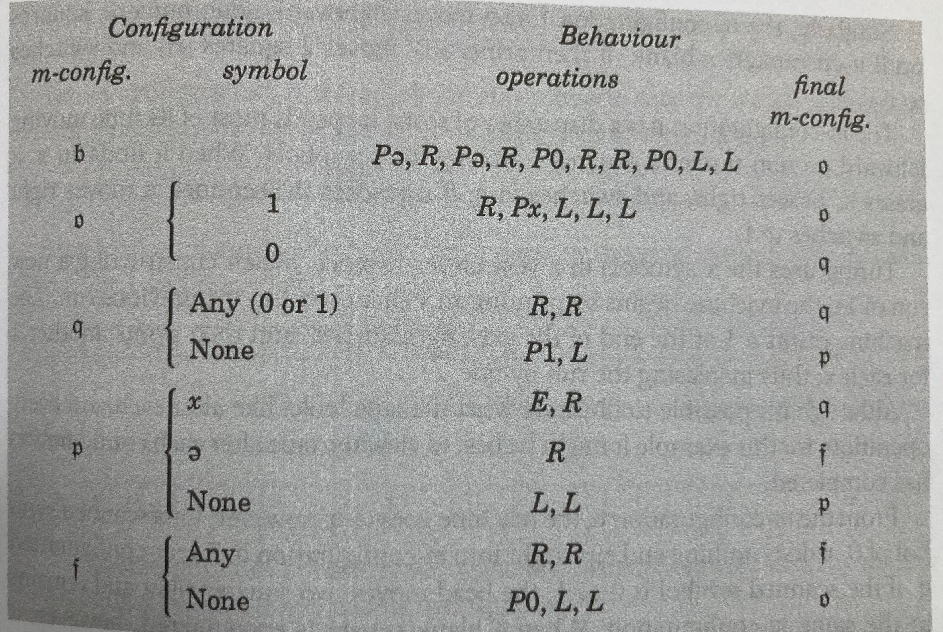
turing87 uses conditional branching to output the irrational number 0.001011011101111... Here is the state transition diagram:
Using array format makes it very concise:
name: turing87
steps:
- states: ["0", "100"]
  actions:
  - [turing, initMachine]
- states: ["100", "1"]
  actions:
  - [turing, printTape]
- states: ["1", "2"]
  actions:
  - [turing, put, "e"]
  - [turing, move, "R"]
  - [turing, put, "e"]
  - [turing, move, "R"]
  - [turing, put, "0"]
  - [turing, move, "R"]
  - [turing, move, "R"]
  - [turing, put, "0"]
  - [turing, move, "L"]
  - [turing, move, "L"]
- states: ["101", "2"]
  actions:
  - [turing, printTape]
- states: ["2", "2"]
  actions:
  - [turing, matchCurrentValue, "1"]
  - [turing, move, "R"]
  - [turing, put, "x"]
  - [turing, move, "L"]
  - [turing, move, "L"]
  - [turing, move, "L"]
- states: ["2", "3"]
  actions:
  - [turing, matchCurrentValue, "0"]
- states: ["3", "3"]
  actions:
  - [turing, isAny]
  - [turing, move, "R"]
  - [turing, move, "R"]
- states: ["3", "4"]
  actions:
  - [turing, isNone]
  - [turing, put, "1"]
  - [turing, move, "L"]
- states: ["4", "3"]
  actions:
  - [turing, matchCurrentValue, "x"]
  - [turing, put, " "]
  - [turing, move, "R"]
- states: ["4", "5"]
  actions:
  - [turing, matchCurrentValue, "e"]
  - [turing, move, "R"]
- states: ["4", "4"]
  actions:
  - [turing, isNone]
  - [turing, move, "L"]
  - [turing, move, "L"]
- states: ["5", "5"]
  actions:
  - [turing, isAny]
  - [turing, move, "R"]
  - [turing, move, "R"]
- states: ["5", "101"]
  actions:
  - [turing, isNone]
  - [turing, put, "0"]
  - [turing, move, "L"]
  - [turing, move, "L"]
Approximately 170 lines reduced to about 70 lines. Array format greatly improves workflow readability.
Step 4: Create the Application (Same as Part 2-2)
The application code is exactly the same. Just change the YAML filename.
TuringWorkflowApp.java
import com.scivicslab.pojoactor.core.ActionResult;
import com.scivicslab.pojoactor.workflow.IIActorSystem;
import com.scivicslab.pojoactor.workflow.Interpreter;
import java.io.InputStream;

public class TuringWorkflowApp {

    public static void main(String[] args) {
        String yamlPath = "/code/turing87.yaml";
        new TuringWorkflowApp().runWorkflow(yamlPath);
    }

    public void runWorkflow(String yamlPath) {
        // 1. Create IIActorSystem
        IIActorSystem system = new IIActorSystem("turing-system");

        try {
            // 2. Create POJO
            Turing turing = new Turing();

            // 3. Wrap with IIActorRef and register with system
            TuringIIAR turingActor = new TuringIIAR("turing", turing, system);
            system.addIIActor(turingActor);

            // 4. Create Interpreter
            Interpreter interpreter = new Interpreter.Builder()
                    .loggerName("TuringWorkflow")
                    .team(system)
                    .build();

            // 5. Load YAML
            InputStream yamlStream = getClass().getResourceAsStream(yamlPath);
            interpreter.readYaml(yamlStream);

            // 6. Execute workflow (max 100 iterations)
            ActionResult result = interpreter.runUntilEnd(100);

            // 7. Display result
            System.out.println("Result: " + result.getResult());

        } finally {
            // 8. Cleanup
            system.terminateIIActors();
            system.terminate();
        }
    }
}
Execution Result (Same as Part 2-2)
Loading workflow from: /code/turing87.yaml
Workflow loaded successfully
Executing workflow...

TAPE    C 0 1
TAPE    C C 0 1 1
TAPE    C C C 0 1 1 1
TAPE    C C C C 0 1 1 1 1
...

Workflow finished: Maximum iterations (100) exceeded
The output pattern shows "0 followed by an increasing number of 1s" (C is a counter). The output is exactly the same as Part 2-2. The only difference is the implementation method of the IIActorRef.
Internal Mechanism: How @Action Works
When callByActionName is called, the IIActorRef base class processes in this order:
- Search for @Action methods — Scans the wrapped object's (
this.object) class for methods annotated with@Action - If found, invoke it — Calls the method via reflection and returns the result
- If not found, fallback — Tries subclass switch statements or built-in actions (like
putJson)
This allows switch-based code and @Action-based code to coexist. Gradual migration is possible.
Summary
The difference between Part 2-2 and Part 2-3 is only Step 2 (IIActorRef creation):
| Step | Content | Part 2-2 | Part 2-3 |
|---|---|---|---|
| 1 | Create POJO | Same | Same |
| 2 | Create IIActorRef | Override callByActionName() | Just add @Action |
| 3 | Create YAML | Same | Same |
| 4 | Create Application | Same | Same |
With the @Action annotation:
- No need to override
callByActionName()— Boilerplate disappears - Manage by method — Easy to add/remove actions
- Coexists with existing code — Gradual migration possible
Less boilerplate means cleaner, more readable code.
Try It Yourself
All examples in this tutorial are available in the actor-WF-examples repository. To run the @Action annotation version:
git clone https://github.com/scivicslab/POJO-actor
cd POJO-actor
mvn install

cd ..
git clone https://github.com/scivicslab/actor-WF-examples
cd actor-WF-examples
mvn compile
mvn exec:java -Dexec.mainClass="com.scivicslab.turing.TuringWorkflowApp" -Dexec.args="turing87-array --action"
See the repository's README for detailed setup instructions and project structure.
References
- Official Manual: https://scivicslab.com/docs/pojo-actor/introduction
- GitHub (POJO-actor): https://github.com/scivicslab/POJO-actor
- GitHub (Workflow examples): https://github.com/scivicslab/actor-WF-examples
- Maven Repository: https://mvnrepository.com/search?q=com.scivicslab
- POJO-actor v1.0 Introduction (blog): A Lightweight Actor Model Library for Java
- Tutorial Part 2-1 (blog): Workflow Language Basics
- Tutorial Part 2-2 (blog): Creating Workflows